Special Events
Resources for temporary, holiday, collaboration, and limited-time events that do not require their own dedicated folder.
Search in Special Events
Advertisement
Resources
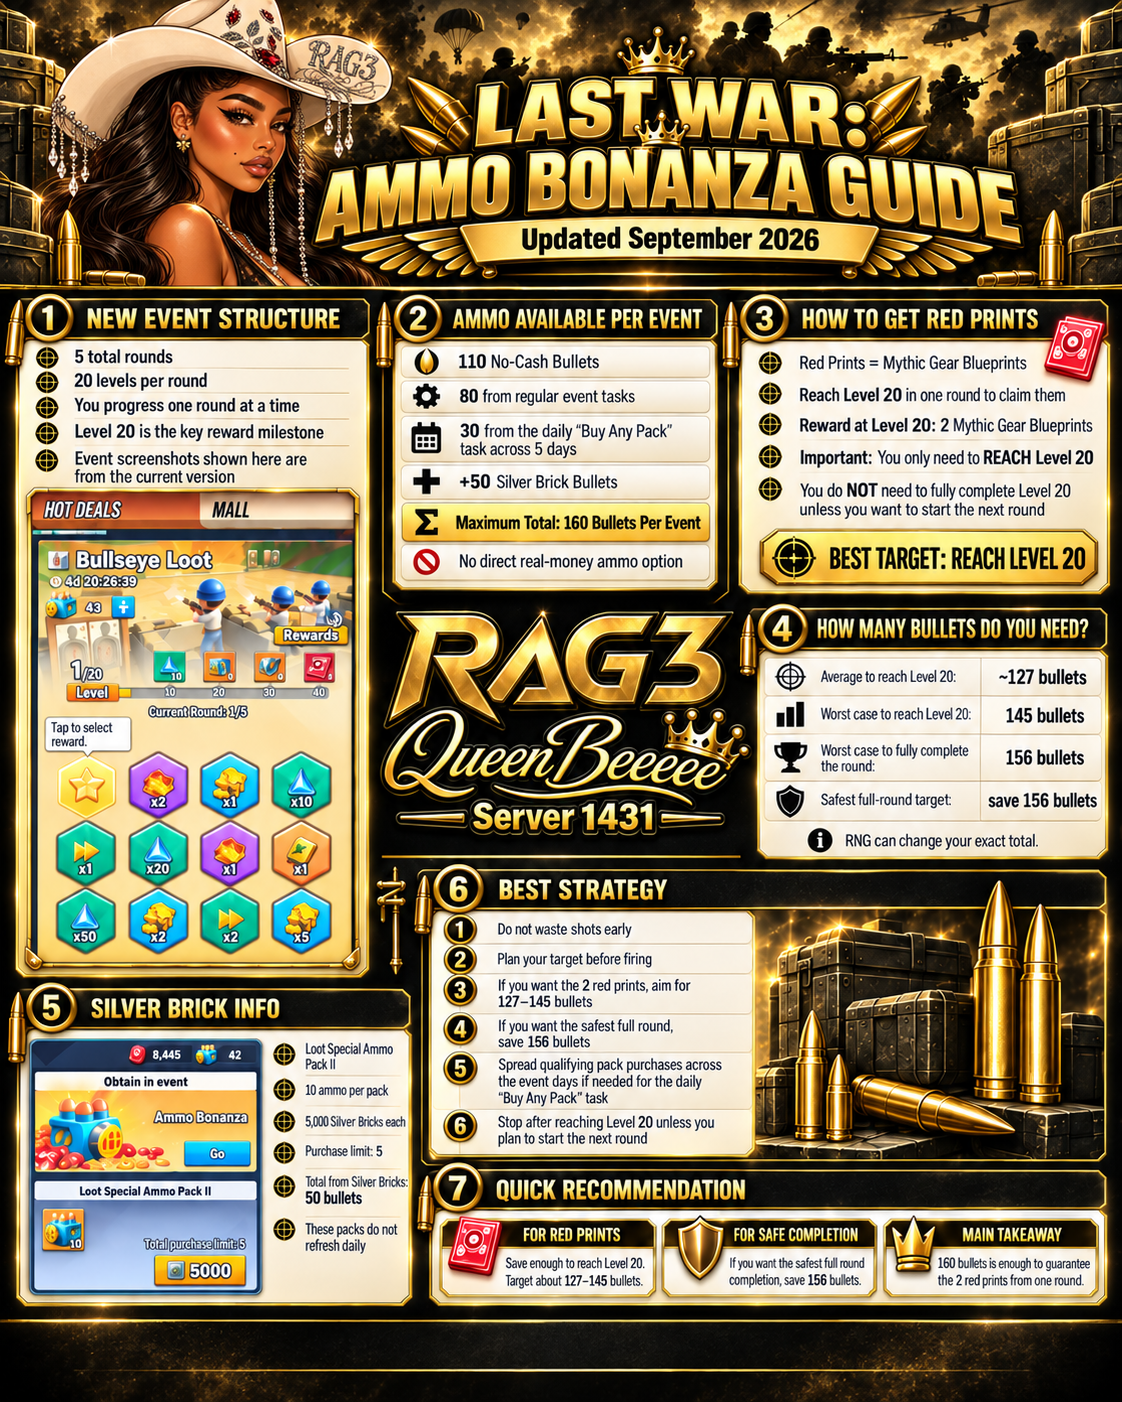
Ammo Bonanza Event Guide and Reward Strategy (September 2026 Update)
Details the Ammo Bonanza event structure, including number of rounds and levels, bullet (ammo) earning methods, and requirements for obtaining Mythic Gear Blueprints (Red Prints). Breaks down Silver Brick pack mechanics, bullet targets for event completion, and offers strategy tips for maximizing rewards, with annotated event interface screenshots.
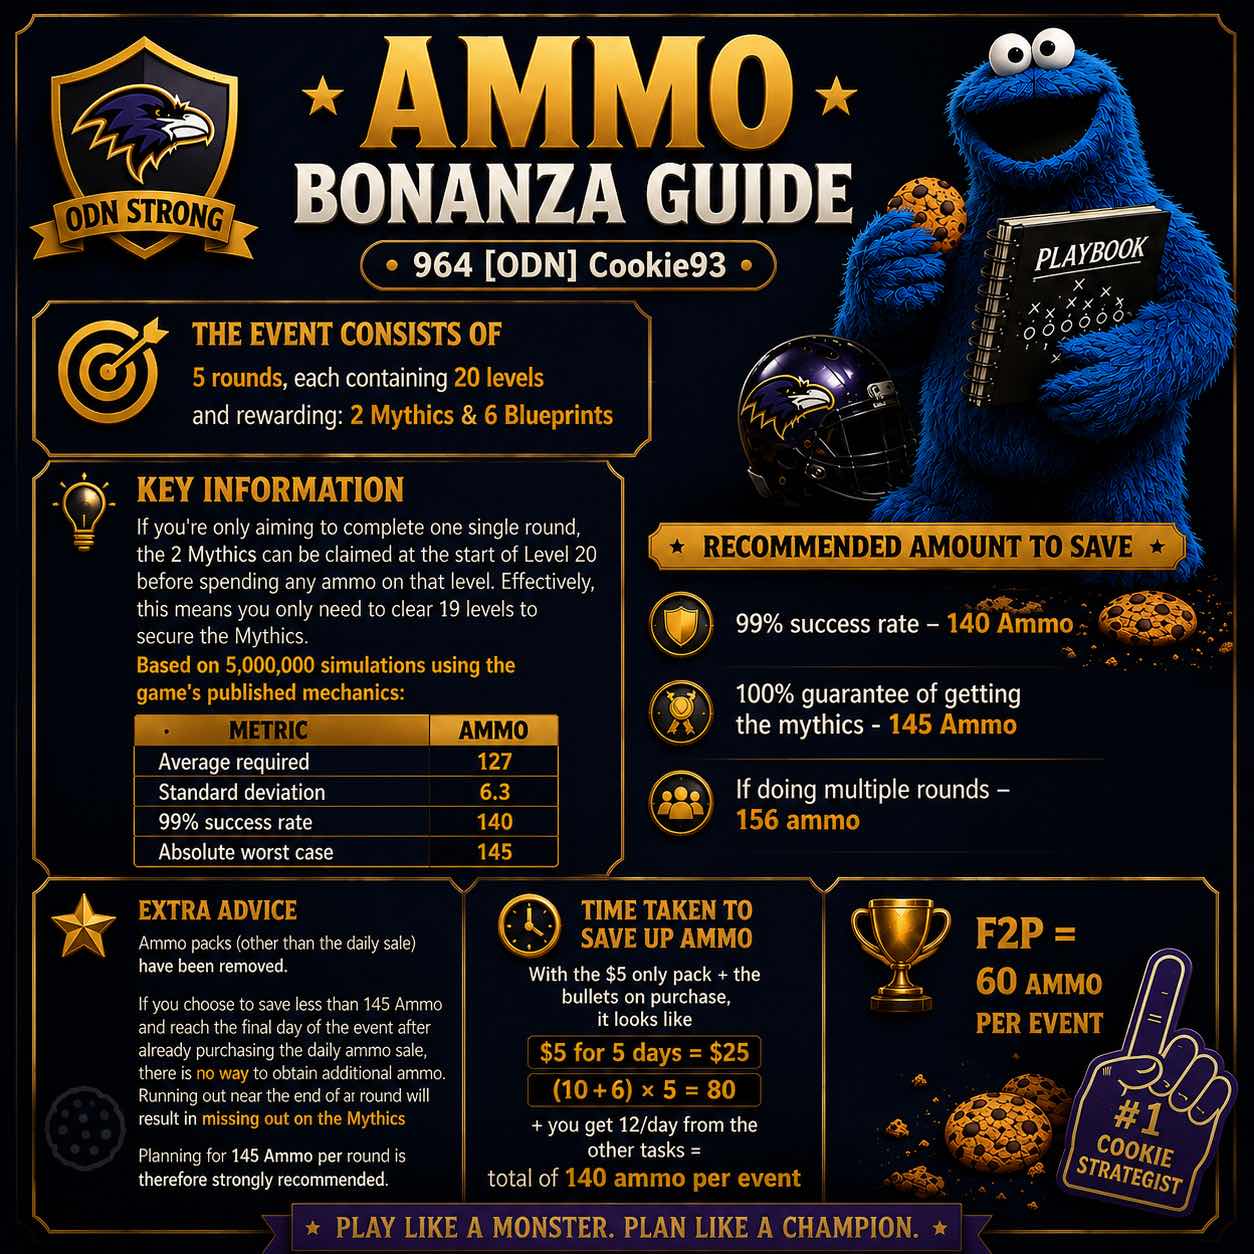
Ammo Bonanza Event Guide: Ammo Requirements, Reward Structure, and Preparation Tips
Breaks down the Ammo Bonanza event structure, including rounds, level count, and rewards. Provides statistical analysis of ammo needed for high success rates, recommended ammo savings, and strategies for both free-to-play and paid players to maximize event rewards and avoid running out of ammo.
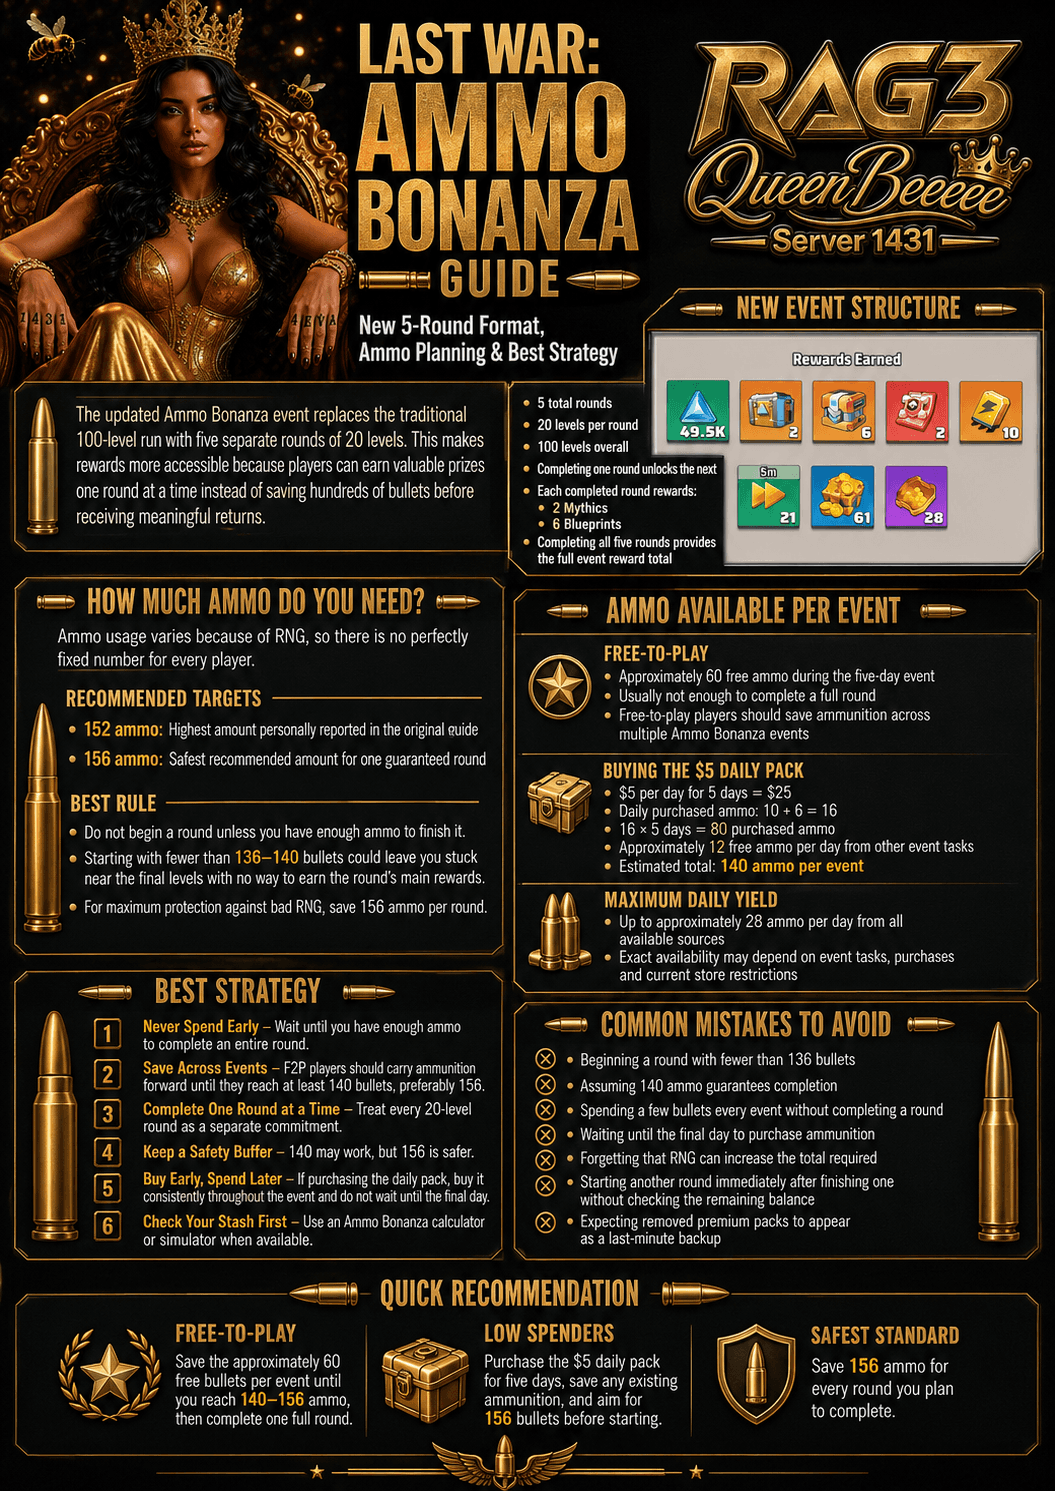
Ammo Bonanza Event Guide: New 5-Round Structure, Ammo Targets, and Strategy
Explains the updated Ammo Bonanza event format, including the new 5-round, 20-level-per-round structure, recommended ammo targets, and optimal strategies for free-to-play and low-spending players. Details ammo requirements, reward breakdowns, common mistakes, and quick recommendations for maximizing event rewards.
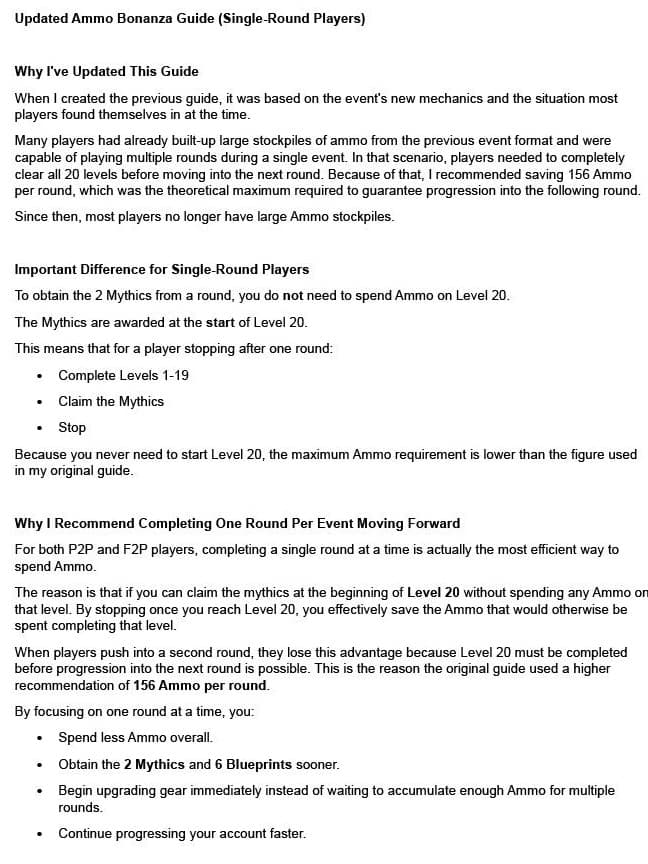
Ammo Bonanza Event Strategy Update for Single-Round Players
Explains optimal Ammo Bonanza event strategy for players completing only one round per event, highlighting that mythic rewards are awarded at the start of Level 20 and recommending stopping after Level 19 for maximum ammo efficiency. Lists benefits such as faster access to mythic rewards and blueprints, and clarifies why previous high ammo stockpile strategies are outdated.
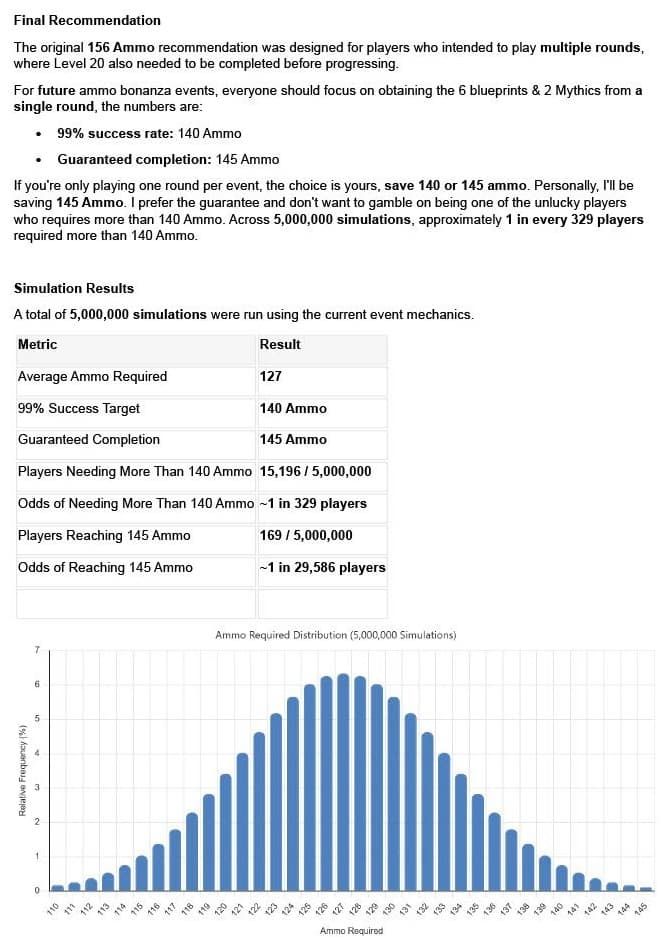
Ammo Bonanza Event: Simulation-Based Ammo Requirements and Success Rates
Analyzes optimal ammo usage for the Ammo Bonanza event, presenting simulation data on the ammo needed to obtain 6 blueprints and 2 Mythics in a single round. Includes a table of key metrics, probability breakdowns for different ammo thresholds, and a histogram of ammo required across 5,000,000 simulations.
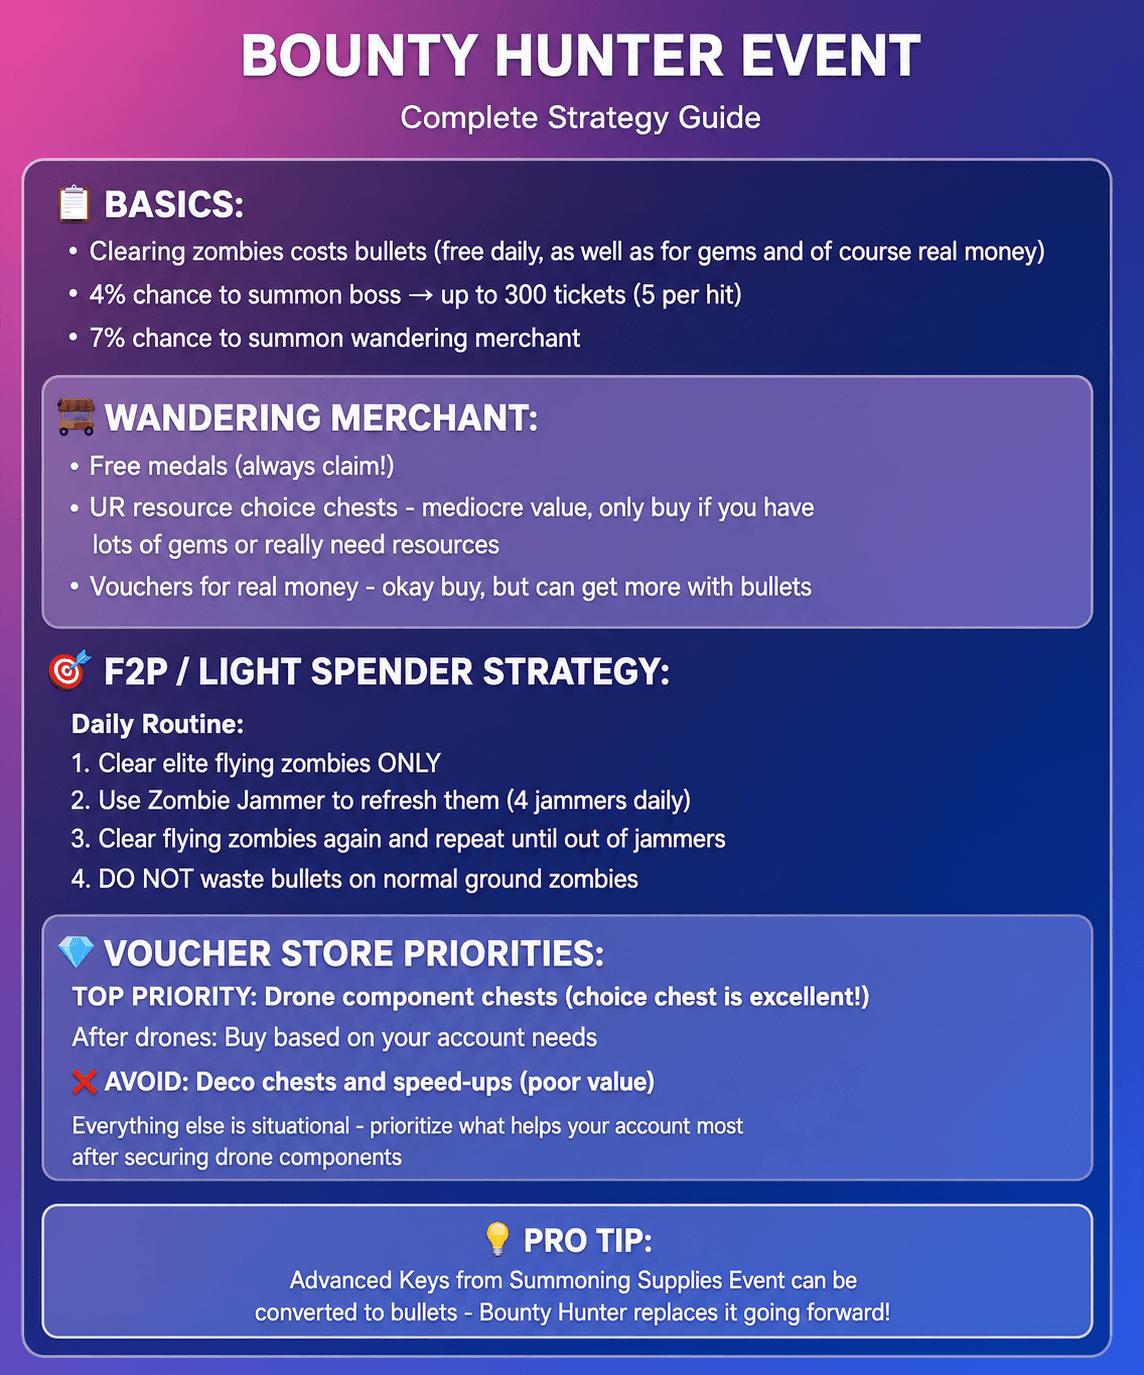
Bounty Hunter Event Complete Strategy Guide
Covers Bounty Hunter Event mechanics, including bullet usage, boss and merchant encounter rates, and daily routines for free-to-play and light spenders. Offers detailed advice on which zombies to target, optimal use of Zombie Jammers, voucher store purchase priorities, and tips for converting advanced keys to bullets.
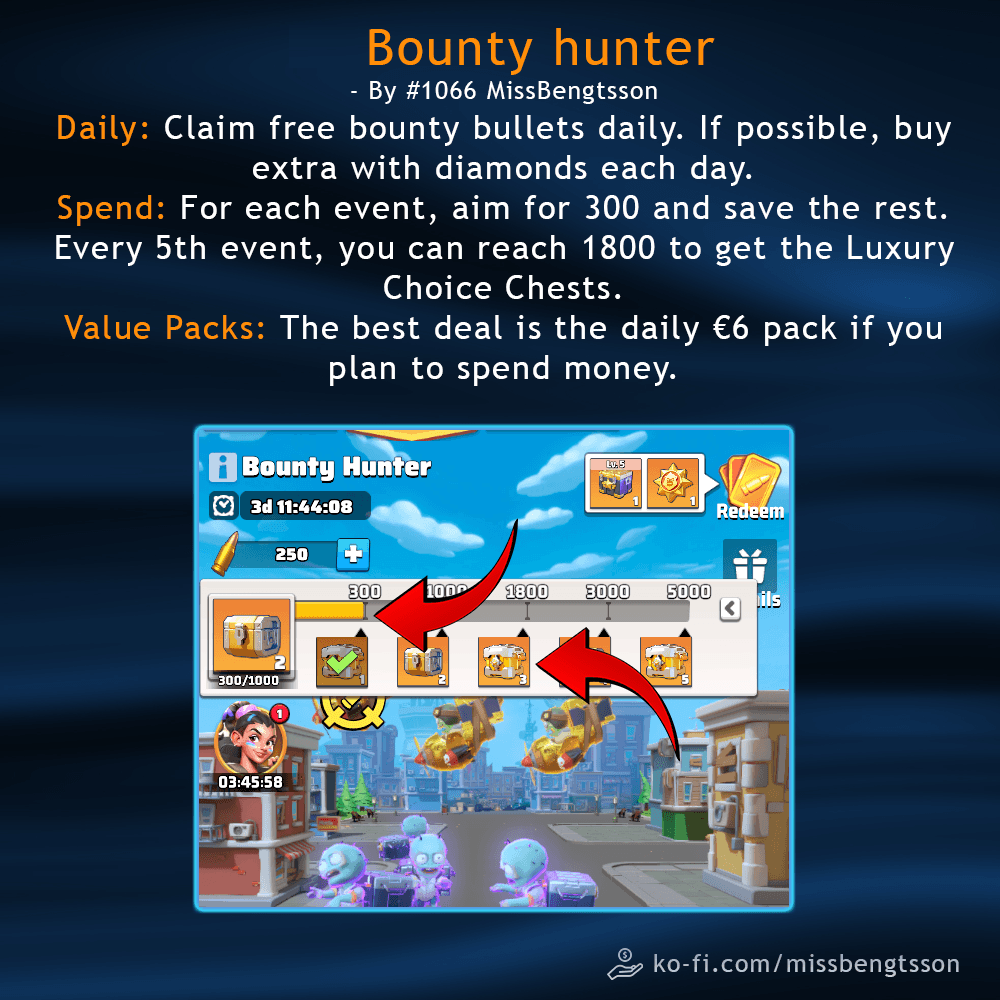
Bounty Hunter Event Overview and Strategy
Summarizes the Bounty Hunter event, detailing daily bounty bullet collection, diamond spending advice, milestone targets (300 and 1800 points), and value pack recommendations. Highlights the importance of reaching specific point thresholds for rewards like Luxury Choice Chests and identifies the most cost-effective value pack for spenders.
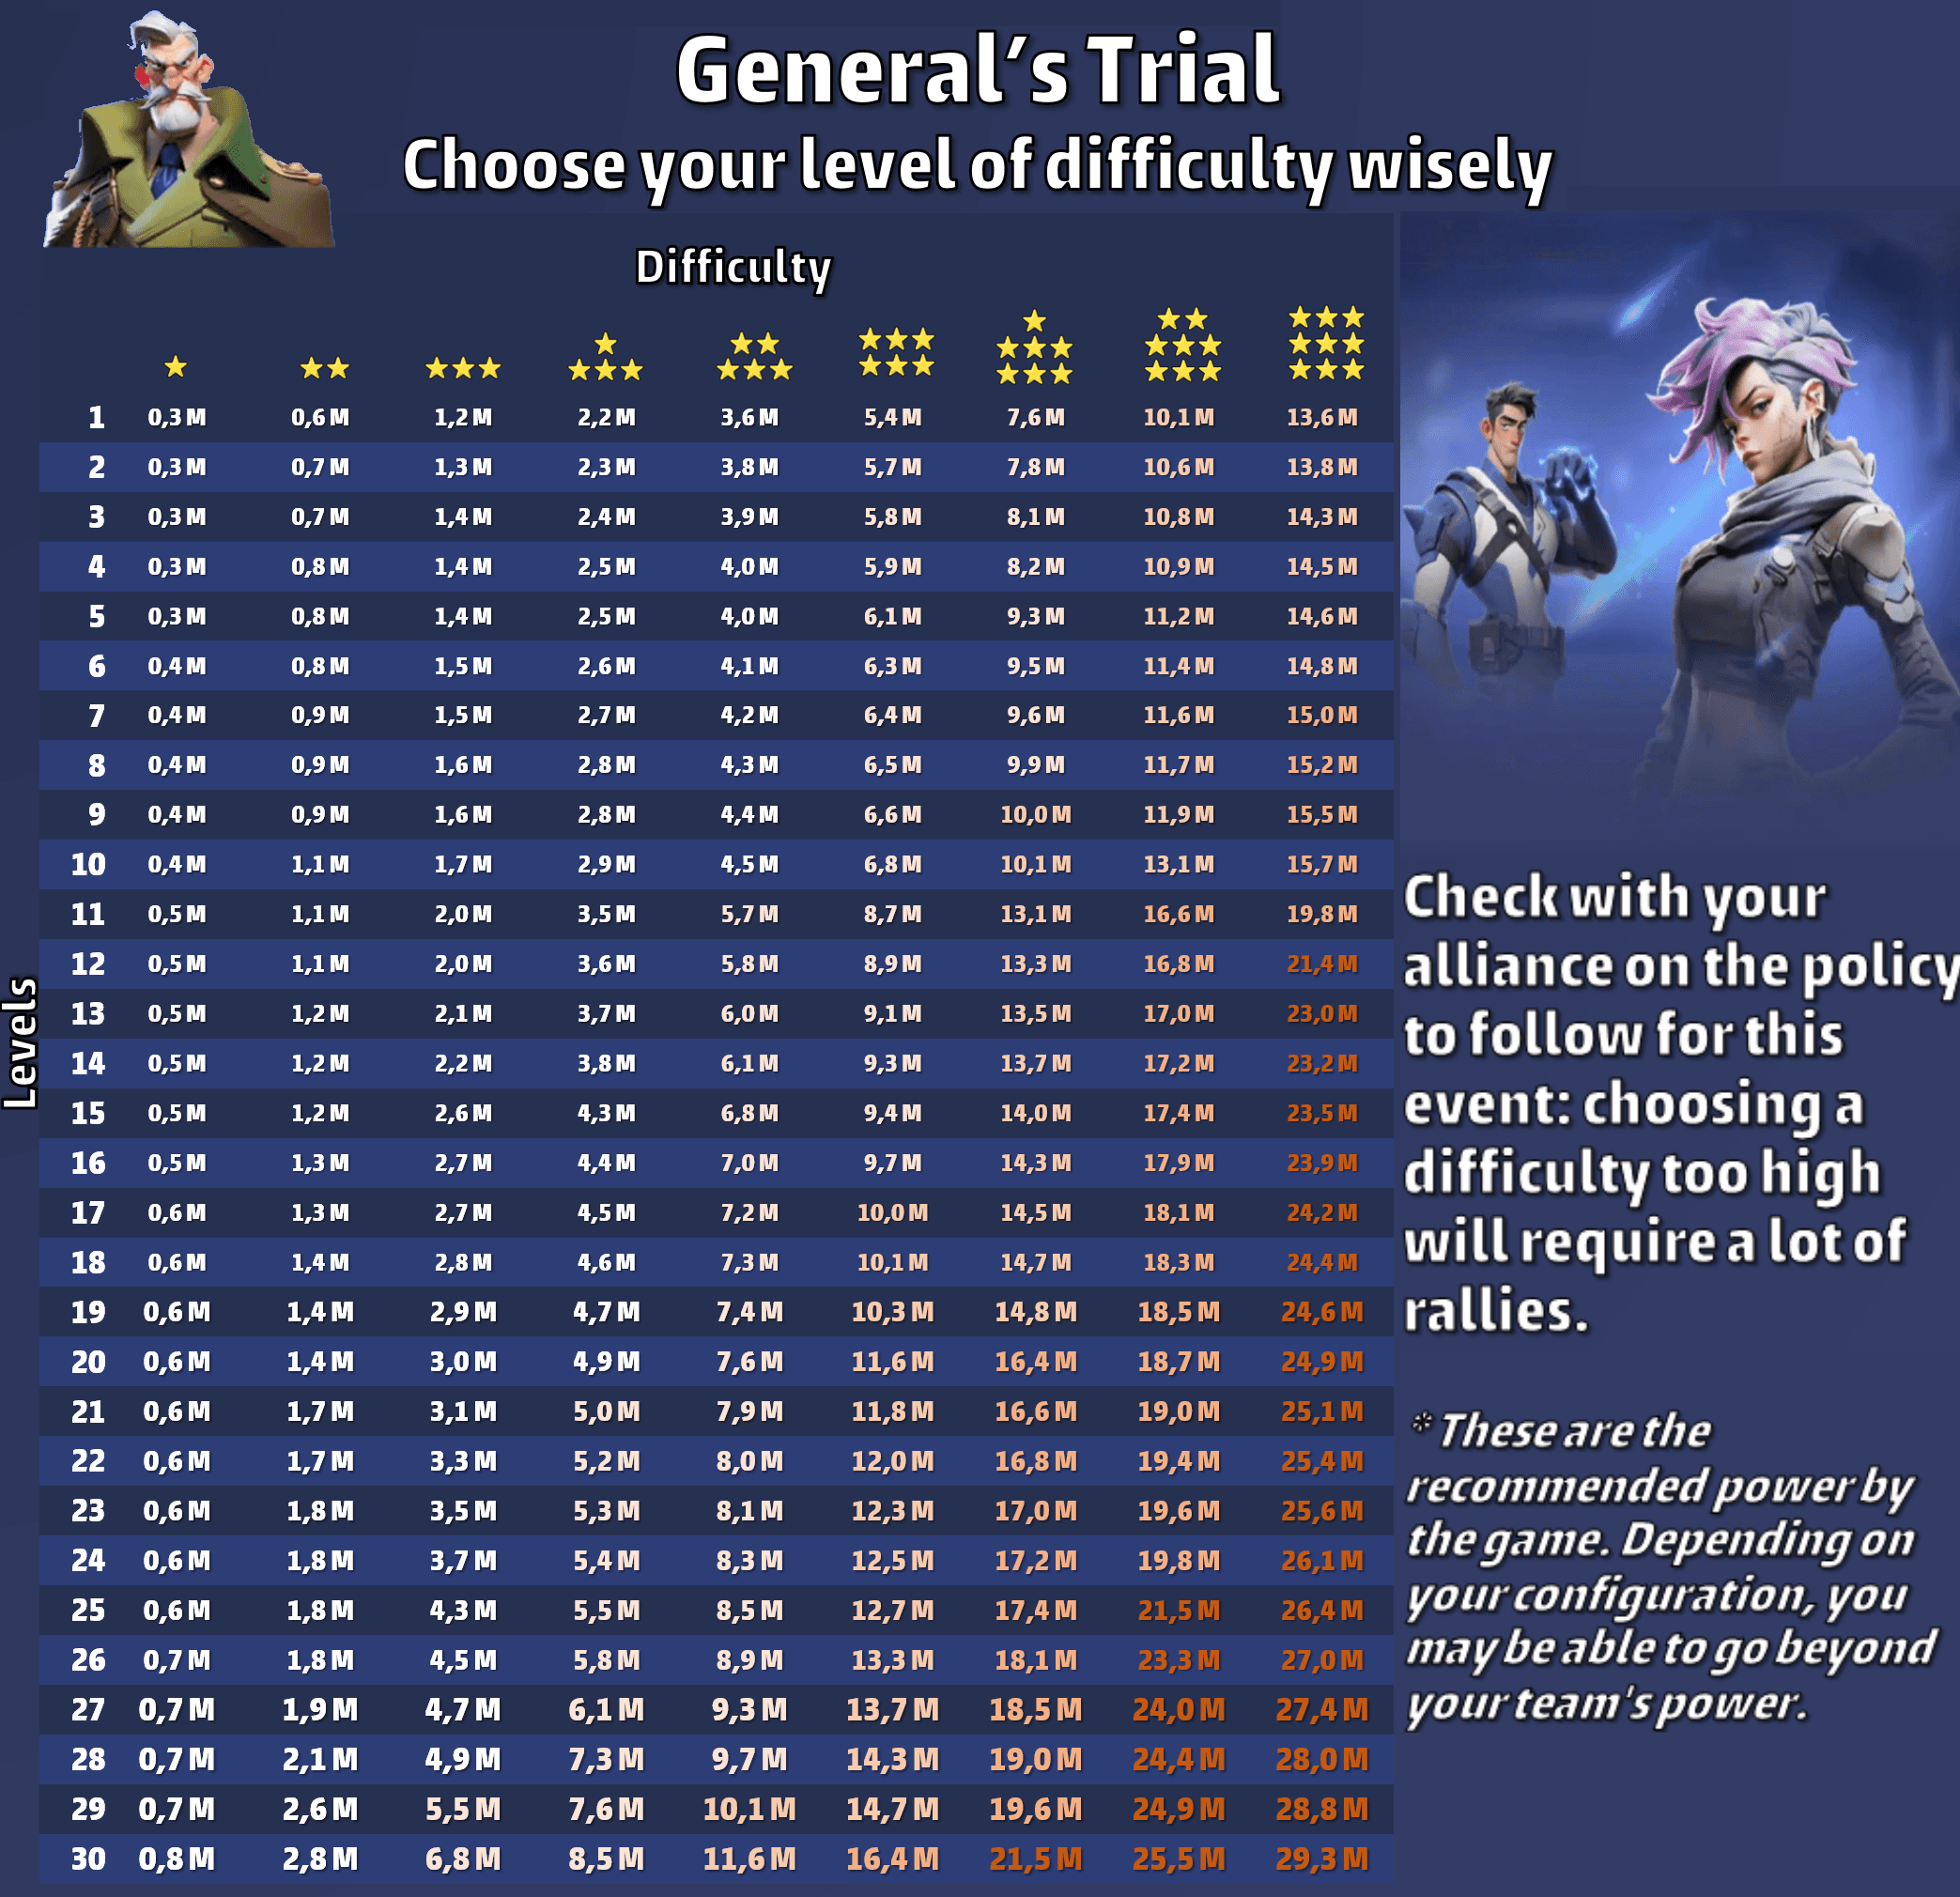
General’s Trial Difficulty and Recommended Power Table
Shows recommended team power values for each level (1–30) and difficulty tier (one to nine stars) in the General’s Trial event, helping players select an appropriate challenge. Includes notes on alliance coordination and clarifies that actual team performance may exceed recommendations.
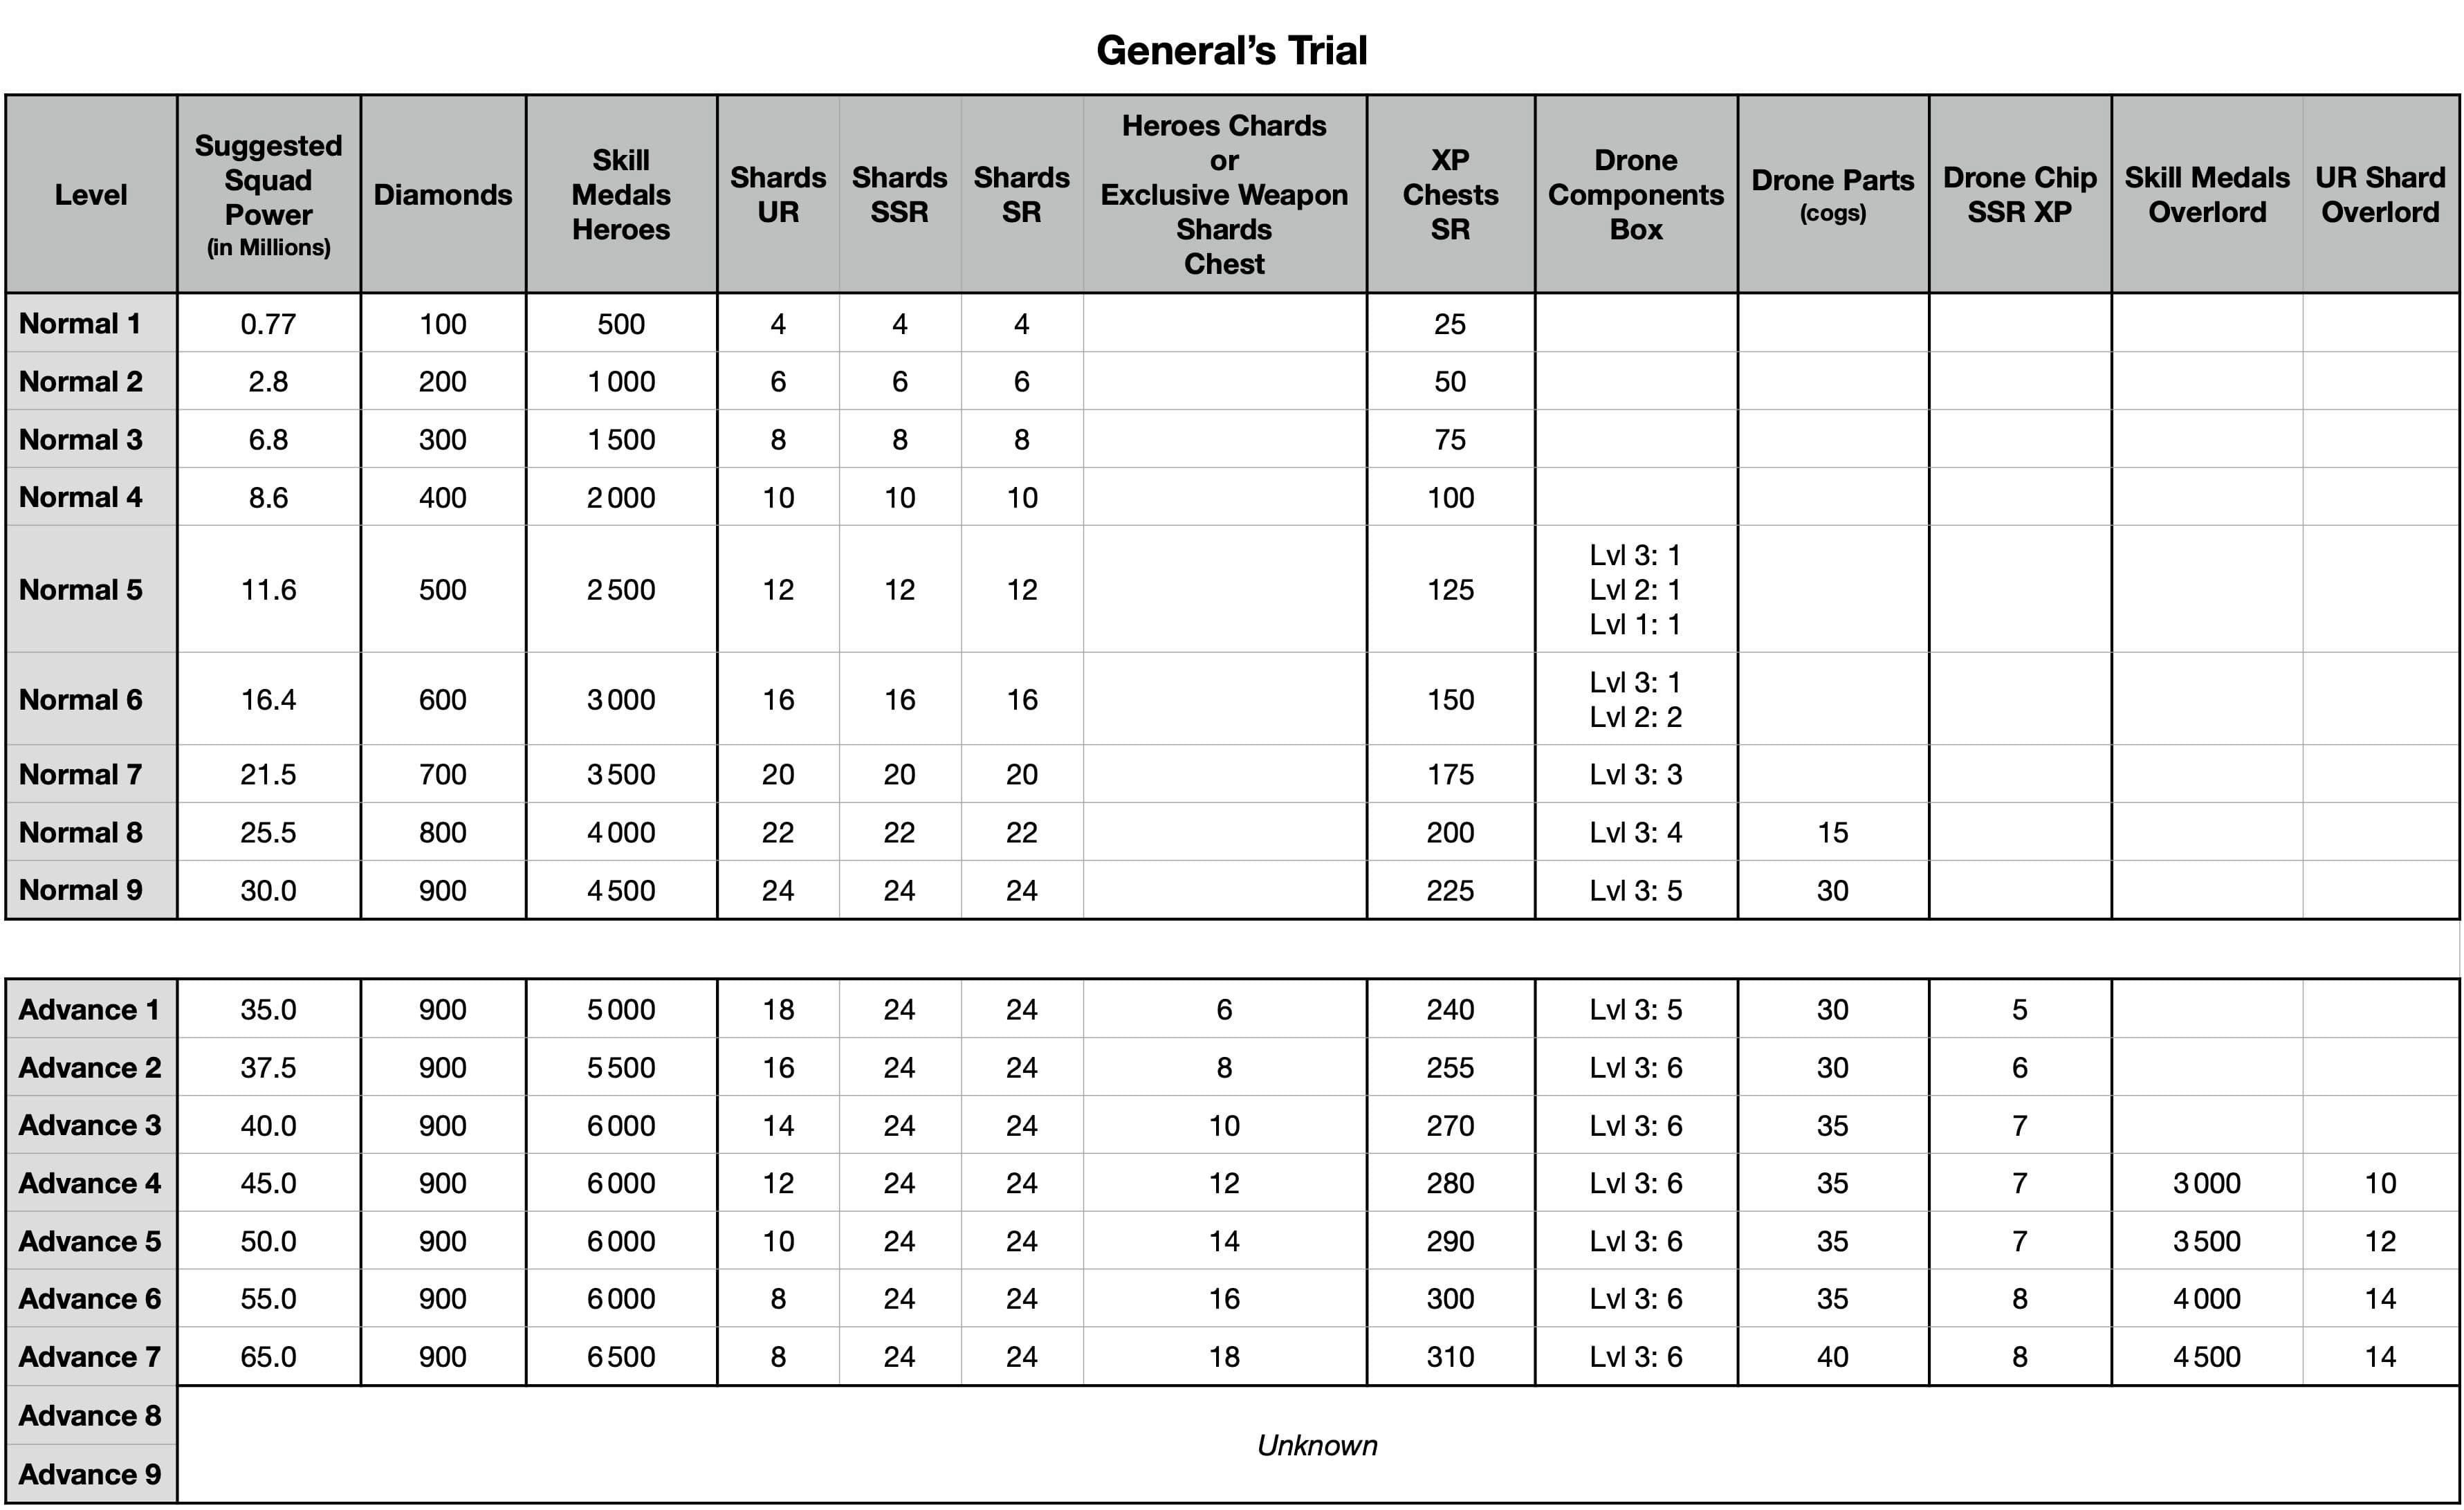
General's Trial Event Rewards and Requirements Chart
Comprehensive chart detailing the rewards and squad power requirements for each level of the General's Trial event, covering both Normal and Advance tiers. Includes specific values for diamonds, skill medals, hero shards, XP chests, drone components, drone parts, drone chip XP, skill medals Overlord, and UR shard Overlord for every level.
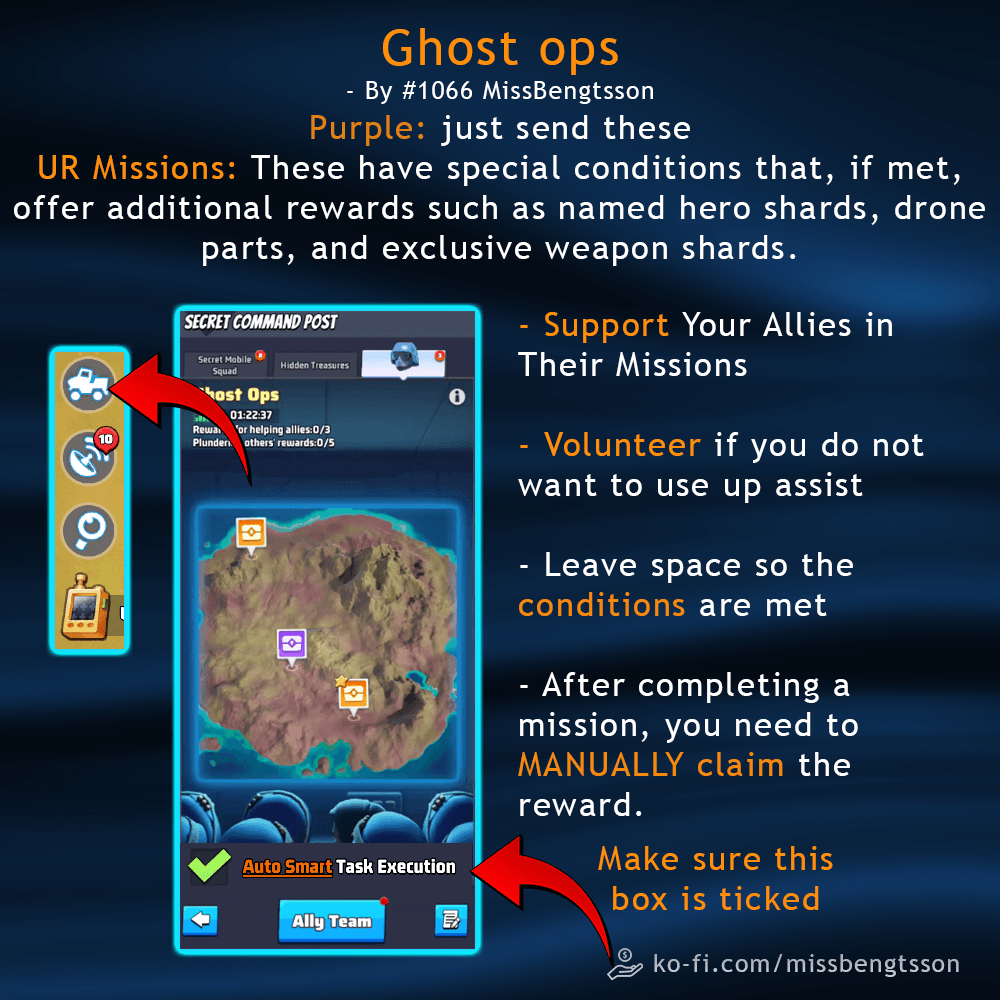
Ghost Ops Missions: Mechanics, Rewards, and Participation Tips
Explains Ghost Ops mission mechanics, including the distinction between purple and UR missions, special reward conditions, and strategies for maximizing rewards. Covers supporting allies, volunteering, leaving space for mission conditions, and the importance of manually claiming rewards, with annotated screenshots of the Ghost Ops interface and task execution options.
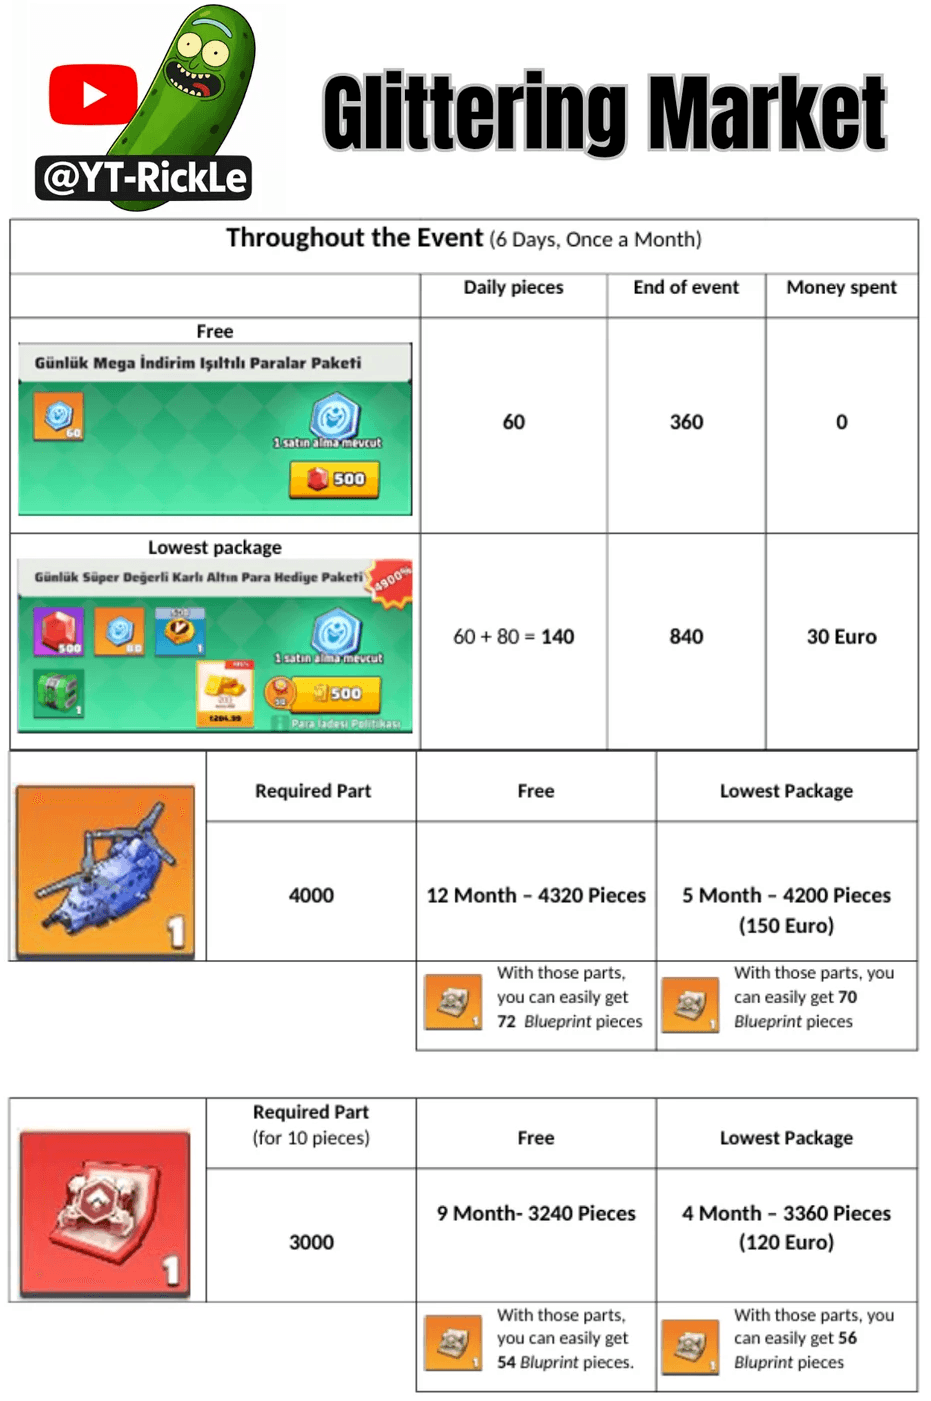
Glittering Market Event: Free vs Paid Helicopter Base & Blueprint Rewards Breakdown
Compares free and paid reward accumulation in the Glittering Market event, detailing daily and total obtainable helicopter and blueprint parts, required quantities, timeframes to reach goals, and Euro costs. Includes calculations for blueprint pieces obtainable with collected parts and visual examples of in-game packages and items.
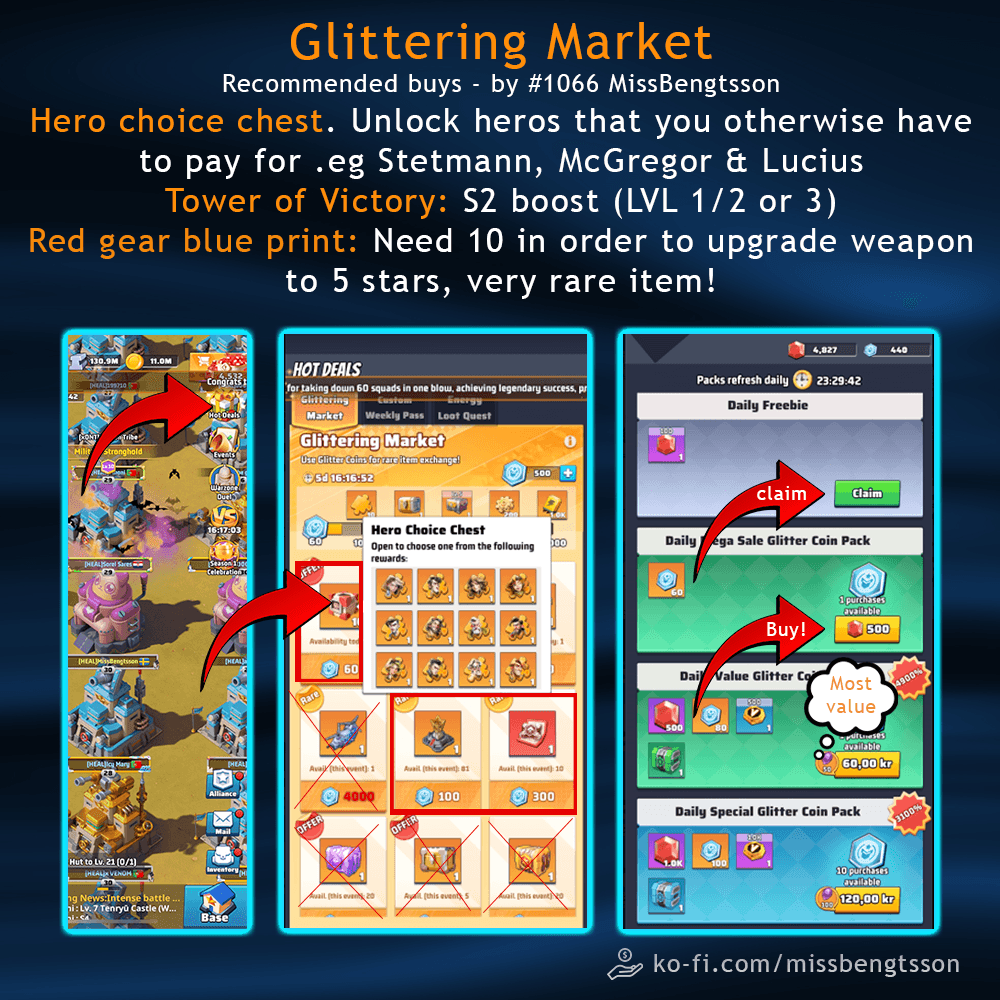
Glittering Market Purchase Recommendations and Value Assessment
Summarizes top recommended purchases in the Glittering Market, including the Hero Choice Chest for unlocking premium heroes, Tower of Victory S2 boost, and Red Gear Blueprint for weapon upgrades. Includes in-game screenshots and advice on prioritizing items based on rarity and utility.
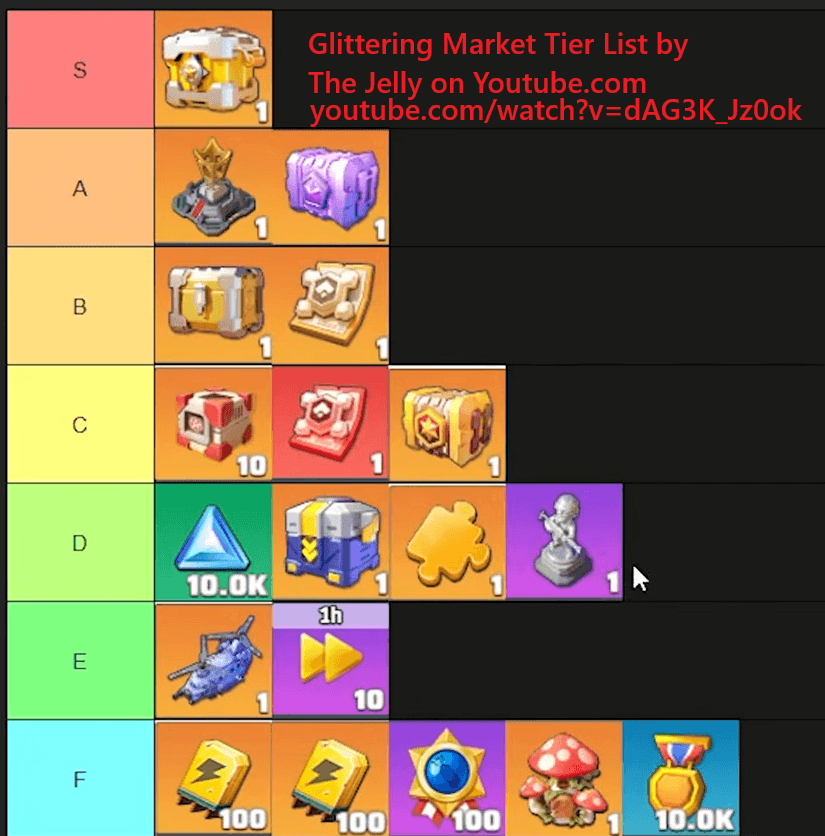
Glittering Market Reward Tier List
Ranks Glittering Market rewards from S to F tier, displaying item icons and quantities in colored rows to indicate their relative value or priority for selection. Useful for deciding which Glittering Market items to prioritize.
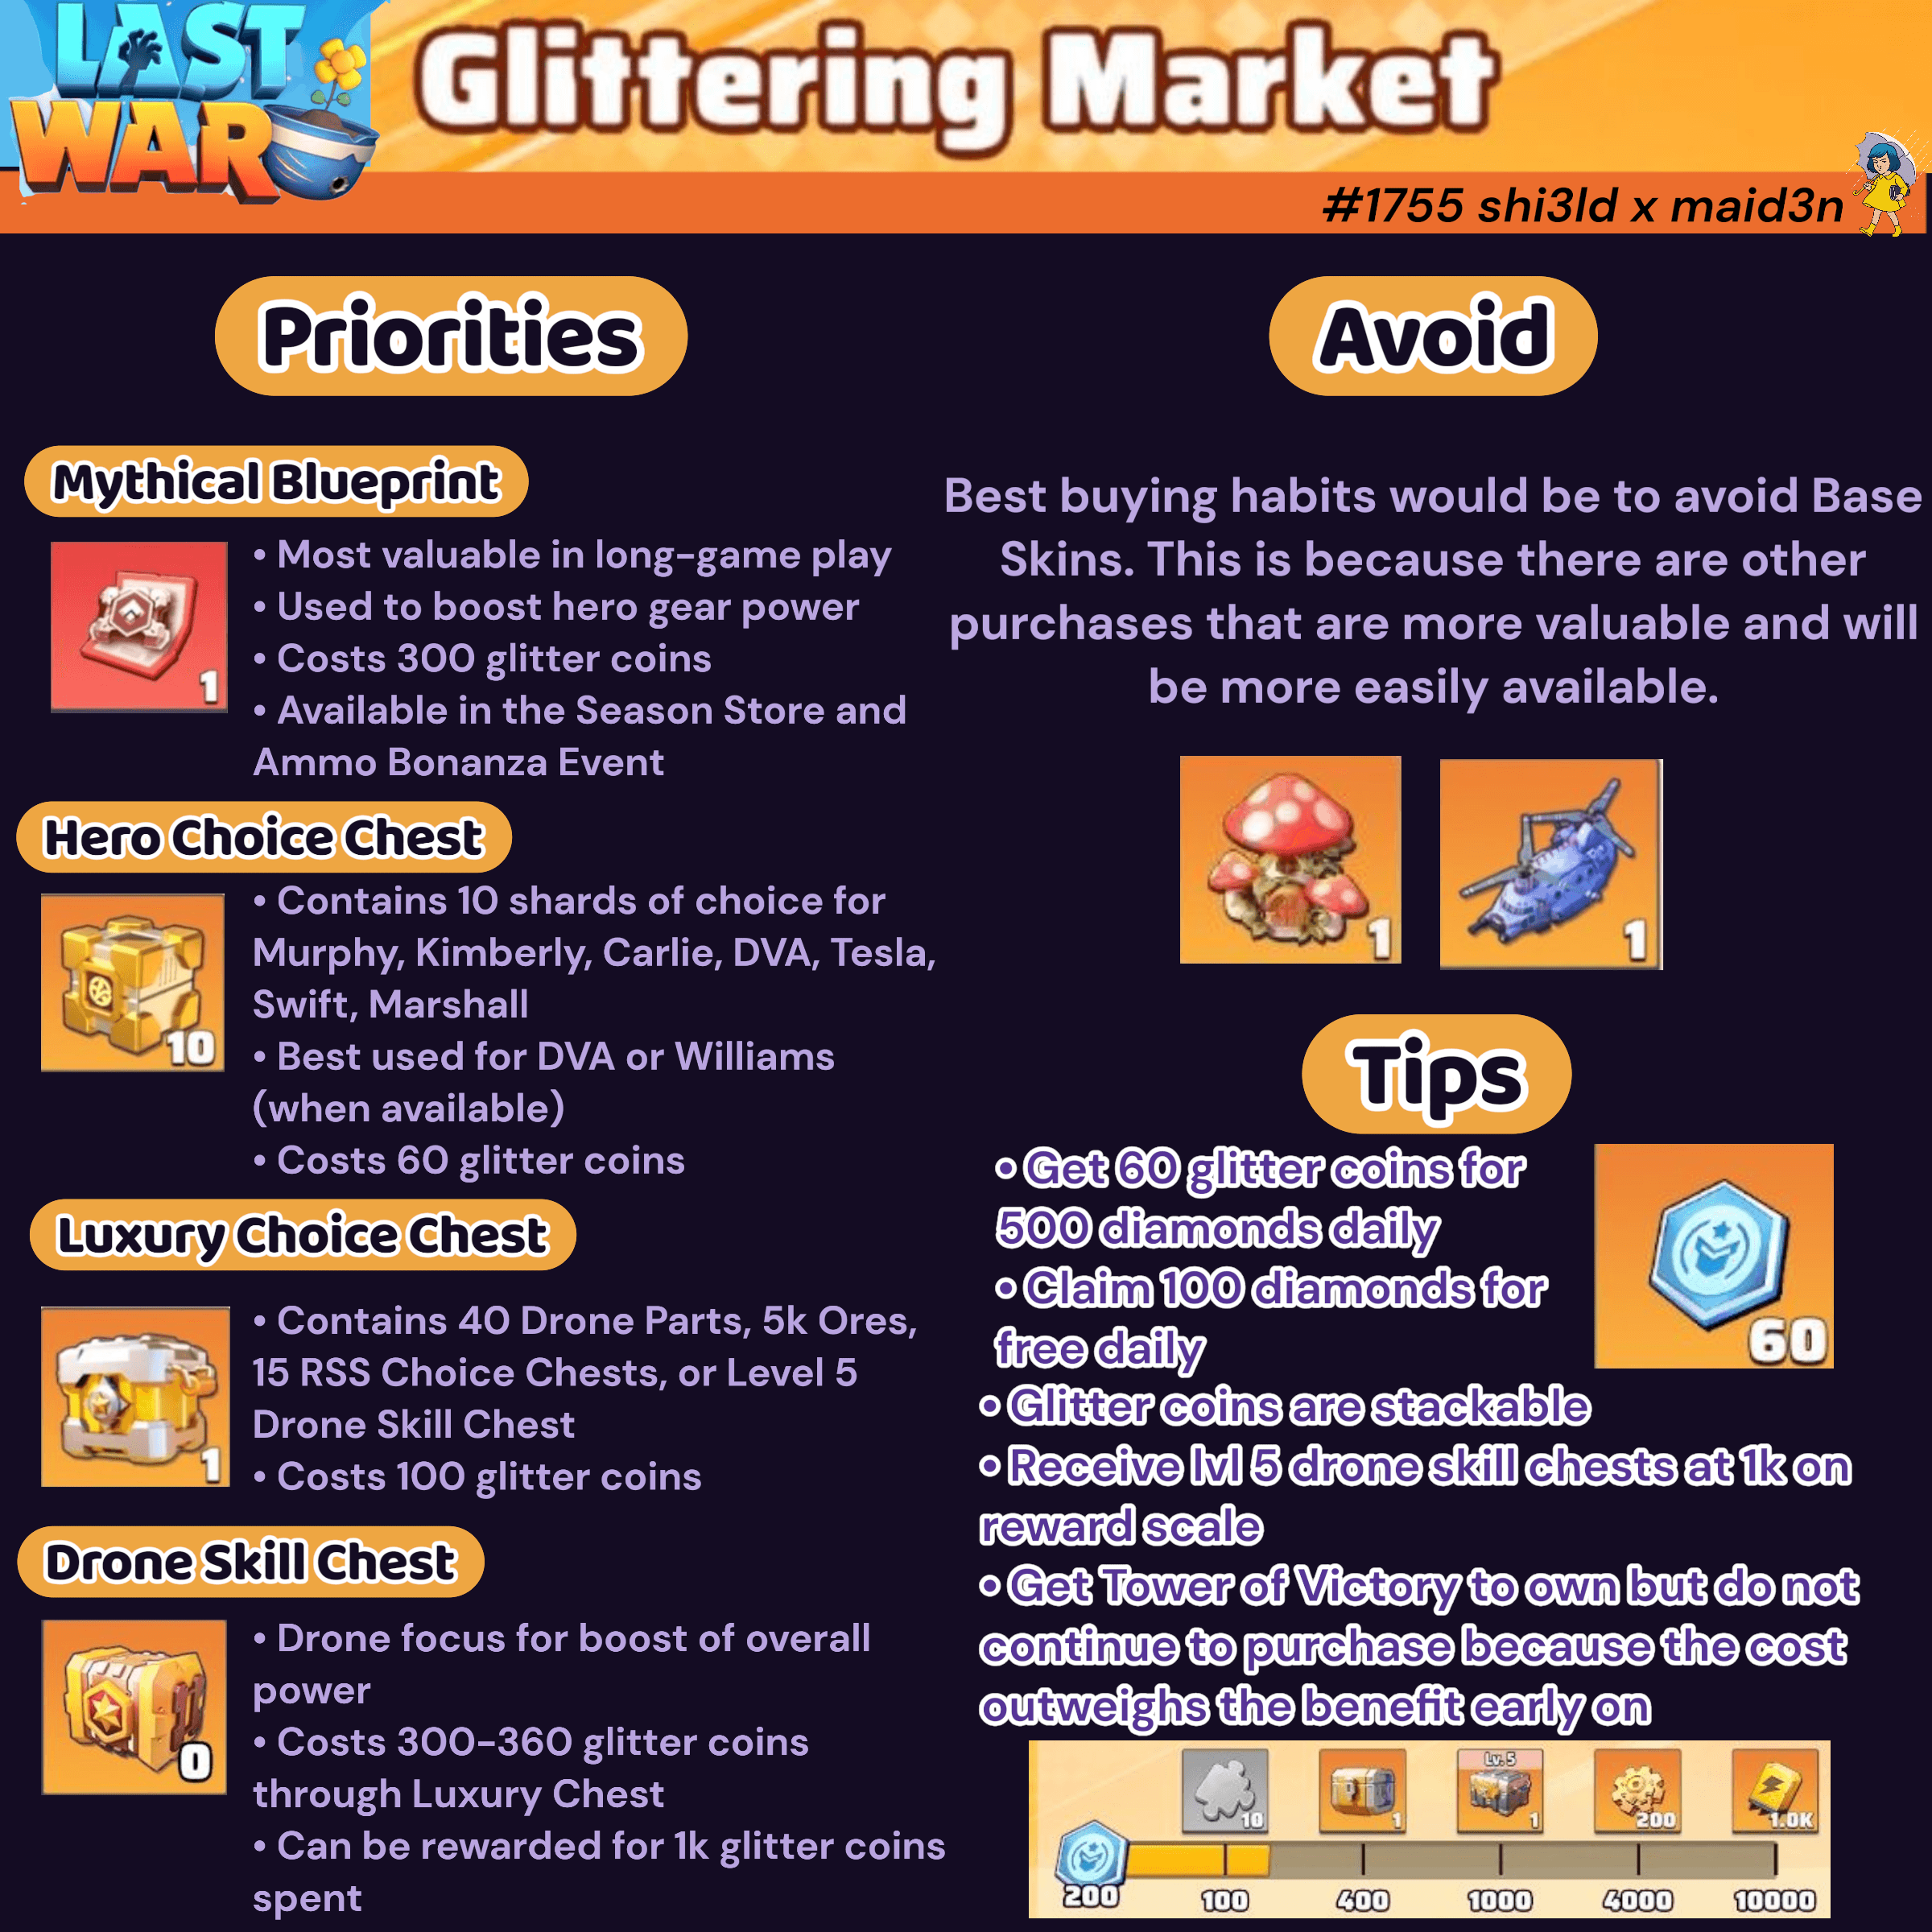
Glittering Market Spending Priorities and Tips
Outlines optimal spending strategies for the Glittering Market event, ranking Mythical Blueprint, Hero Choice Chest, Luxury Choice Chest, and Drone Skill Chest as top purchases. Includes item costs, hero options, and practical tips for earning and using glitter coins efficiently, while advising against buying base skins.
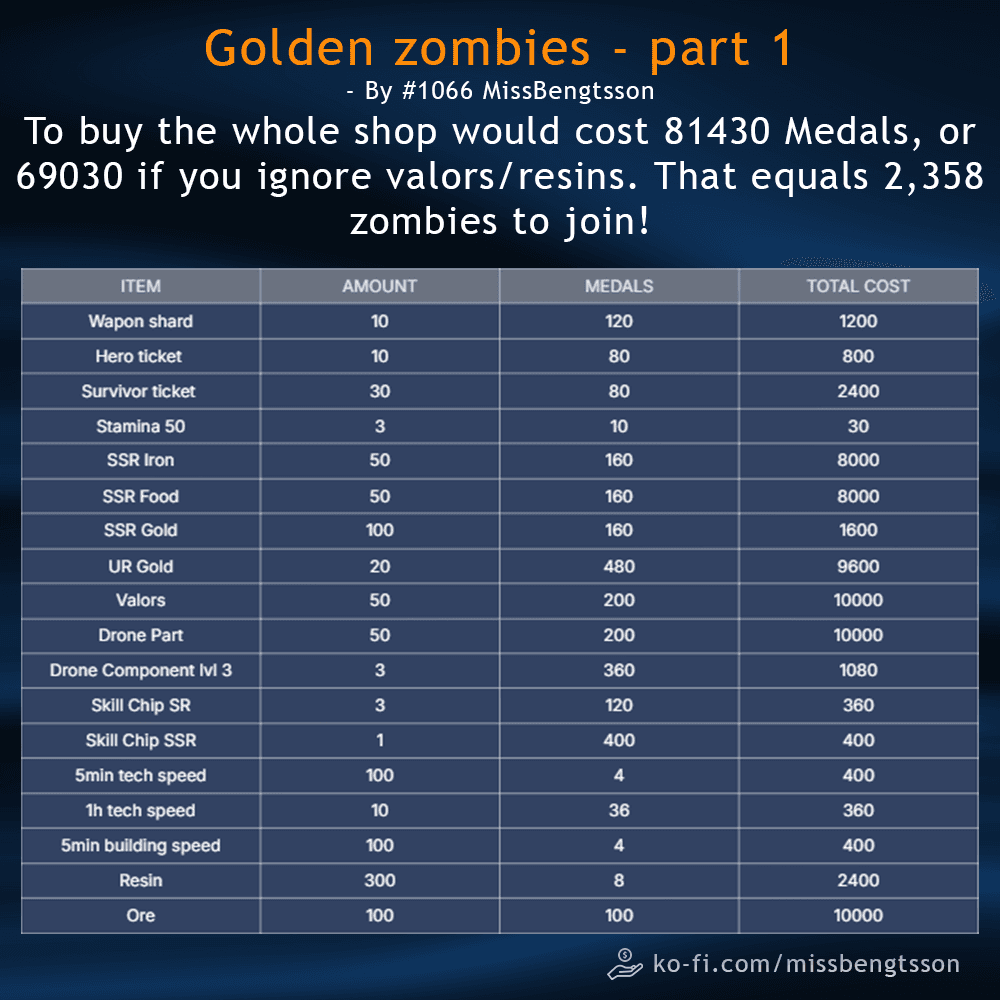
Golden Zombies - Shop Costs & Medal Requirements (1)
A two-part infographic showing Golden Zombies shop costs, medal requirements, stamina estimates, and the approximate number of zombie joins or boss kills needed to clear the shop.
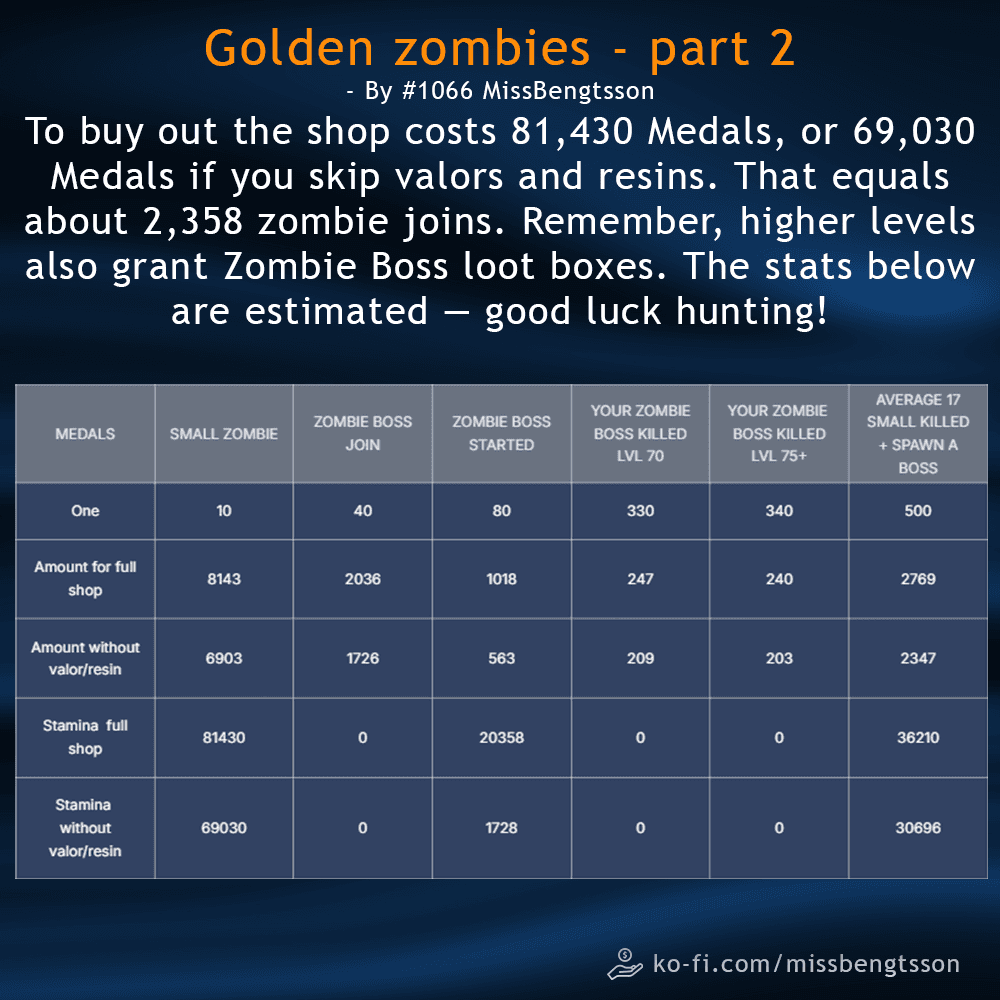
Golden Zombies - Shop Costs & Medal Requirements (2)
A two-part infographic showing Golden Zombies shop costs, medal requirements, stamina estimates, and the approximate number of zombie joins or boss kills needed to clear the shop.